You saw the marble nail trend and knew you had to have those lovely swirls. Two hours later you are crying in frustration at blobs of goo that look nothing like the photos. Sound familiar? If so, you are in the right place my friend.
I would go into a long story about the day I decided I loved marble nails and my long…long journey to get them right. However, you are here for answers and answers you will get. For starters, I am going to address specific troubleshooting errors as I get to them in the tutorial. So if you know you have a problem at a specific part, just jump ahead to that part of the tutorial. And, if you want a way to redeem your botched nails scroll to the very end of the post.
You are in luck though. The very first step and ingredient is the most. I repeat the most crucial piece to changing your nails from a blob to a pleasing swirl.
The nail polish
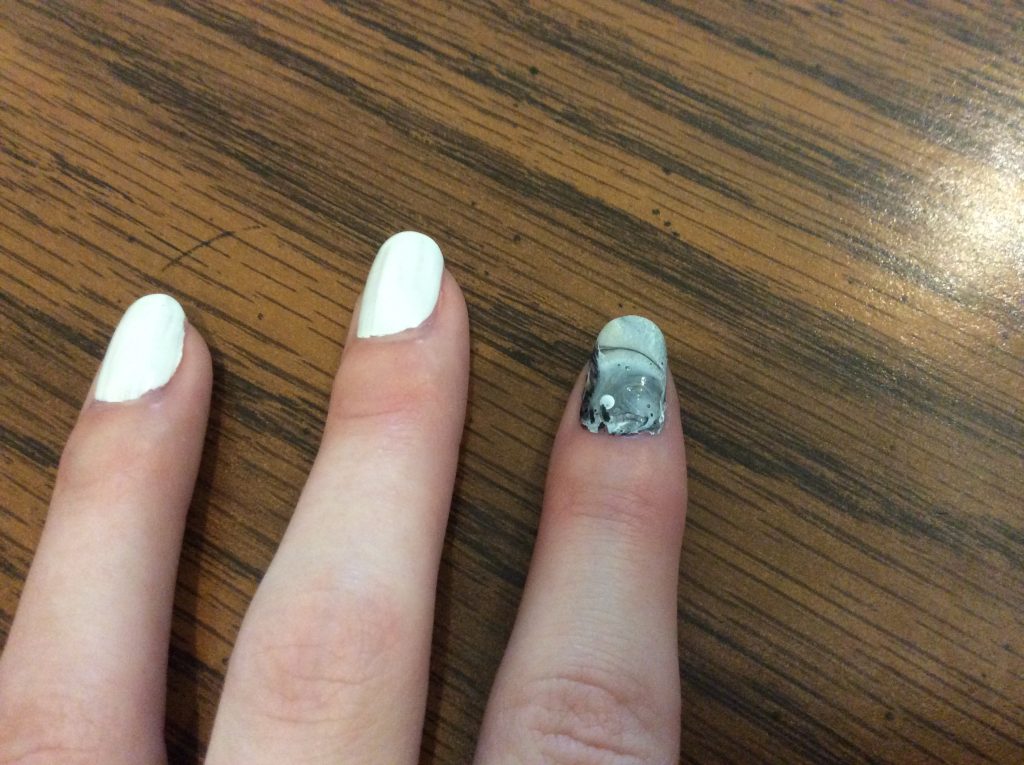
If you have a polish that spreads onto the water like this….
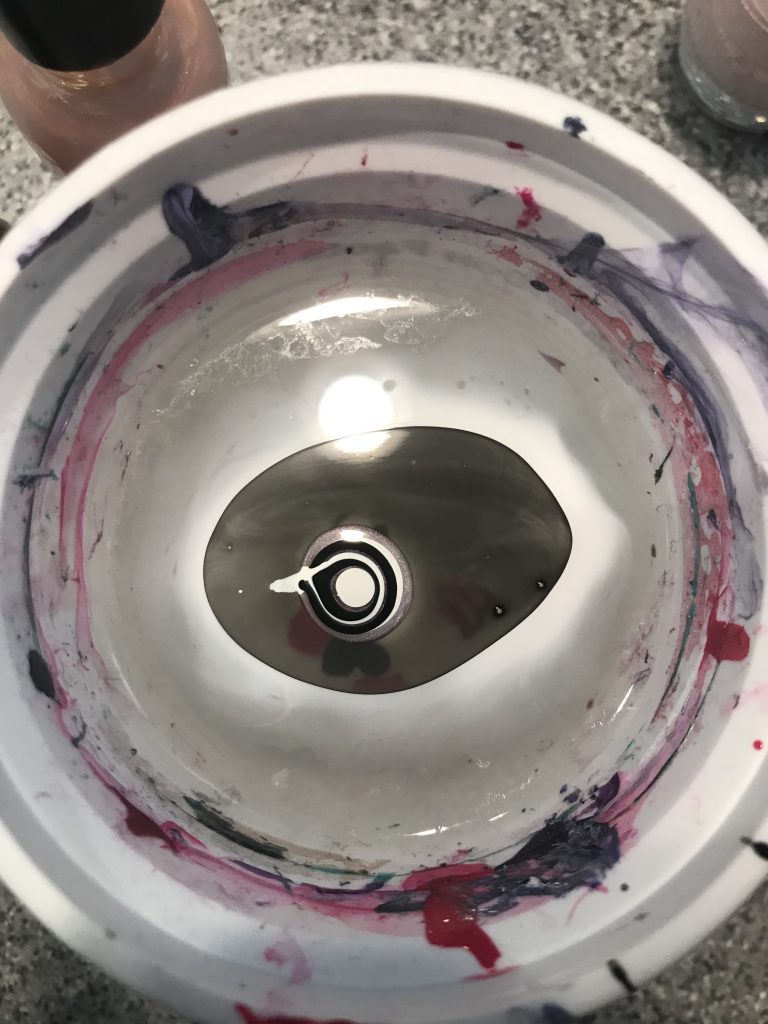
You’re doomed. I know that sounds harsh, but it’s true. If your cup looks like this then your nails will look like this
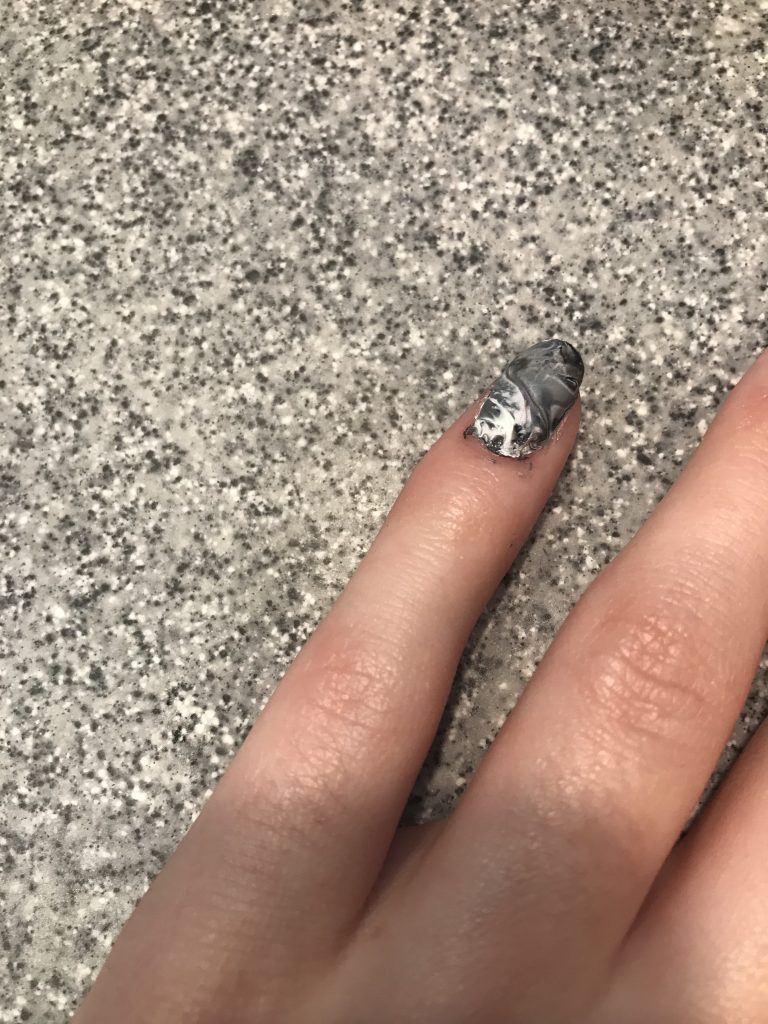
It won’t matter how carefully you position your finger or how slowly/quickly you dip your finger in. I used the polish that did end up working and tested both of those variables and it simply makes no difference.
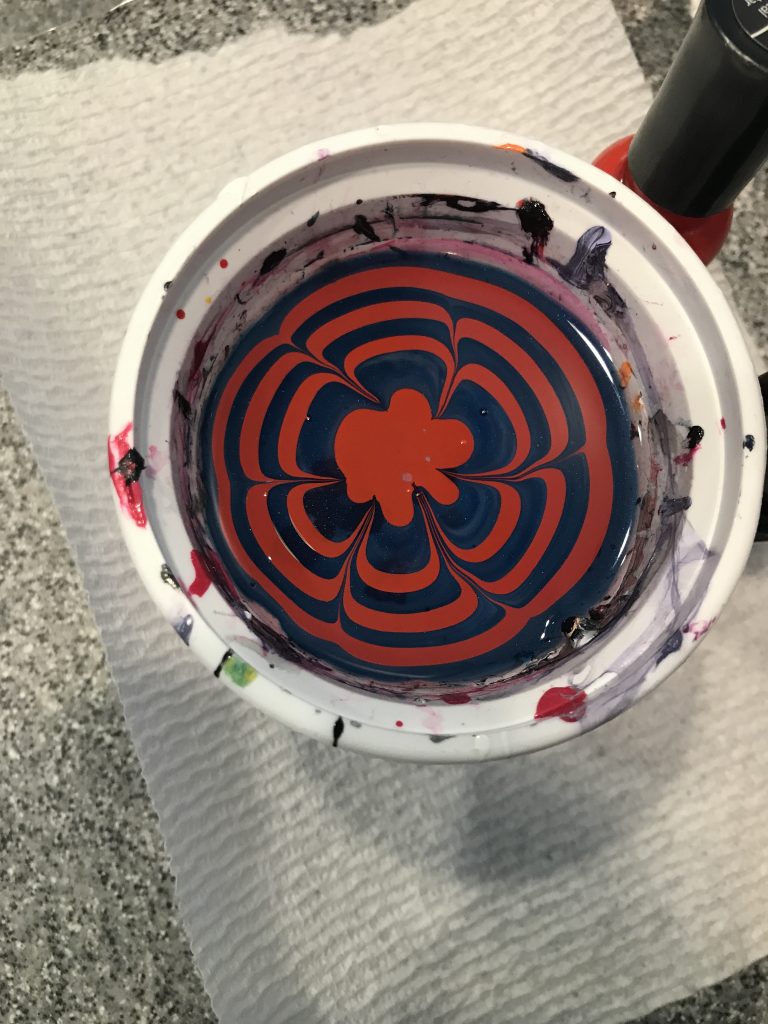
Now that I have shown you what it should not look like, here’s what it should do.
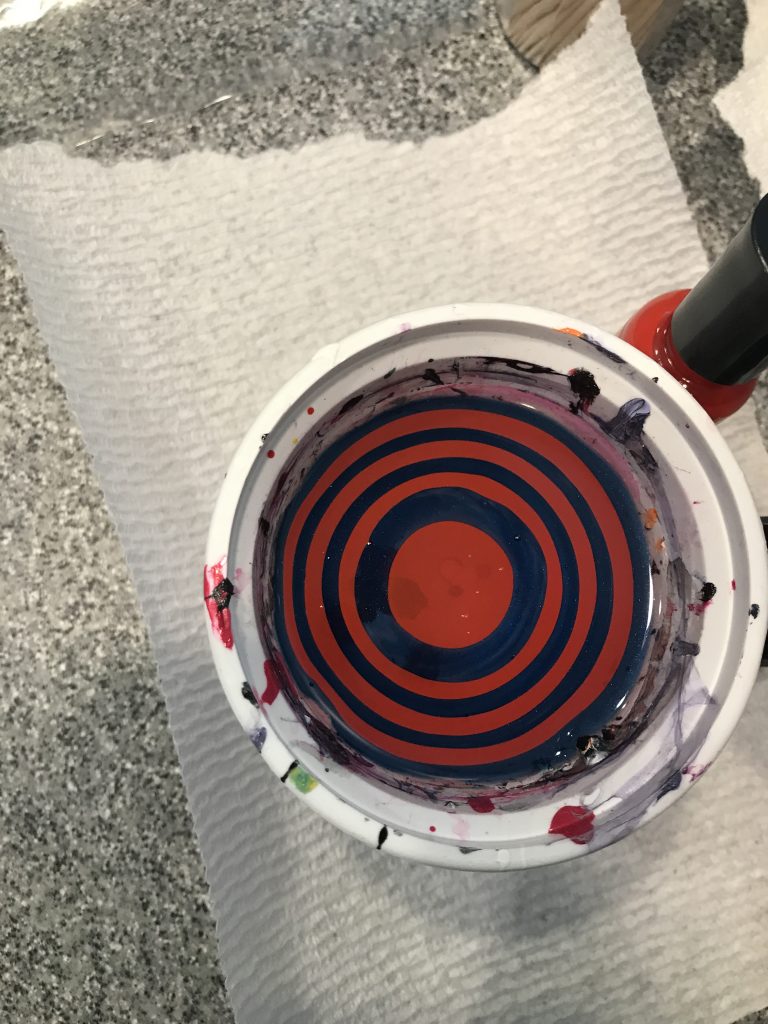
“Ok, you’ve made your point. How do we get the right polish though?” Excellent question. My best answer…trial and error. This is part of the reason I do not recommend marble nails for beginners. To find a polish that works correctly, you just have to buy it and try it. Some people will say that certain brands work, but I found that even within the same brand there are large differences. For instance, in that first photo the polish I am using is Sally Hansen® White on Time polish and the Sally Hansen® Insta-Dri Black to Black polish. These did not work. However, the Sally Hansen® Xtreme Wear Hard as Nails® Red-ical Rockstar (second picture) did work. In that same brand though, the Xtreme Wear™ Pacific Blue did not work. So, I can’t tell you to use a specific brand or even a specific line. My best advice is to gather together what nail polish you have and drop it onto the water until you find polish that works. It isn’t very scientific, but when I find a better way to tell I will let y’all know. I will say that the newer and thinner the polish, the more likely it will work.
The Rest of the Supplies
- A cup or some sort of dish. Nothing fancy is needed. I used a yogurt cup, but you could use an old mug or cup. The goal is to use something that your mom won’t scream at when she finds you are using it for nail polish.
- Room temperature water. The temperature of the water affects the spreading of the polish so if you find that your polish is not spreading as well, check the temperature. I usually fill my cup with half hot and half cold water from the tap to get the right temperature.
- Toothpicks. You will need a toothpick for creating your pattern and getting the polish off the surface of the water. I use 1 toothpick per nail, but I would get out extra if you are just beginning.
- Petroleum Jelly. This is to put around your nail for easier cleanup. I tried glue and that worked ok, but I prefer the jelly. Slather that stuff all over your nail probably at least up to halfway to the joint of your finger on both front and back. However, be careful that you don’t put too much right next to your nail or when you take it off it will smear onto your design.
- A plastic sandwich bag. I use this to put the toothpicks on so I don’t have to go all the way to my trashcan every time. It also helps to have the toothpick handy for the cleaning the polish off the water.
- Small strips of paper towel for cleaning and for putting under your cup. Water marbling is a messy business and with the petroleum jelly approach you are going to need something to clean up the mess. I prefer small strips rather than a whole paper towel because it doesn’t drag through other nails as I clean.
“When is she going to actually get to a tutorial?!” Right now.
- Paint your nails white. I have seen people who use one of the colors they are planning to drip into the water as their basecoat, but I have not had much success with this. It might work if you had a really dark color, but I found with the light colors it did not pop like the white undercoat did. As you can see in this picture, I did my ring finger with the yellow undercoat instead of white and it looks more washed out.
- Pick at least two colors of polish that will spread as mentioned above (test this and your pattern before dipping your nail in)
- Open your polish bottles (You need to be speedy for this to work so leave those bottles open, but please close them afterwards. I have lost bottles of polish that way)
- drop the polish from close to the the surface of the water in a bullseye fashion.
- Keep alternating your polishes until you get about 6 or 8 rings. I don’t have a set number for this, but make sure it is enough that the pattern will look interesting and not just stripes.
- Use a toothpick to create your design of choice (which you have practiced beforehand). I like to pull in the polish from the edges to create a scalloped pattern, but you can do whatever you want. Also, I heard this from CutePolish (which does not endorse this blog, I am just giving credit to them for this idea). Don’t start at the very outermost ring of the polish as it has already dried. Start a ring or two in and start dragging from there. My design ended up looking like this
- Find a part of the pattern that you like (it will end up looking exactly like this on your nail so be choosy here).
- Dip your nail in and hold it under the water while the polish on top dries. Now, I tested this out and it does not matter what angle you do this at or how quickly you do it, so don’t stress about this too much.
- After the polish on top has dried, pull it off with the toothpick being careful to keep your finger in the same place and to not poke your design.
- Now, pull your finger out of water with your nail the last to come out. Your nail should be flat coming out of the water. Before you go stressing, this particular part is not crucial. You can pull it out any way you want. This method just cuts down on the water left on your nail. If you do get water on your nail, very carefully use the corner of a paper towel piece to just barely graze the top of the water droplet. It will absorb the water and you’re good to go!
- Your finger now looks like a giant mess so start wiping off the petroleum jelly with the paper towel pieces. Be very careful around your nail as the jelly can rub onto the nail and cause distortions of your pattern. If you really want to get all the paint off of your cuticle, wait until the polish has dried and then go get in the pool or soak your nail. The polish will come off your skin, but not off the nail (although it might come off your nail so do this with caution).
- You did it! Now pat yourself on the back (with the other hand of course).
- I would not recommend putting on a clear topcoat until at least the next day, if at all. If you do it the same day the polish will bleed with the brush strokes (It actually looks kind of neat, but it’s a whole different look).
Now I do one nail at a time so I don’t mess up my other nails. I did try dipping in two nails at once and while it does work, it is much harder to control the pattern that ends up on your nail. Also, try your very best to resist the urge to clean up your nail bed with nail polish remover until the design has completely dried. When you do use remover, I would recommend a Q-tip instead of a cotton ball. The cotton ball can rub the polish off your other nails when you aren’t looking. And finally, with water marbling you will never get all your nails to look the same. There will be one or two you absolutely adore and a couple you really want to redo. If you want perfection, go to a salon. If you want adventure, try water marbling.
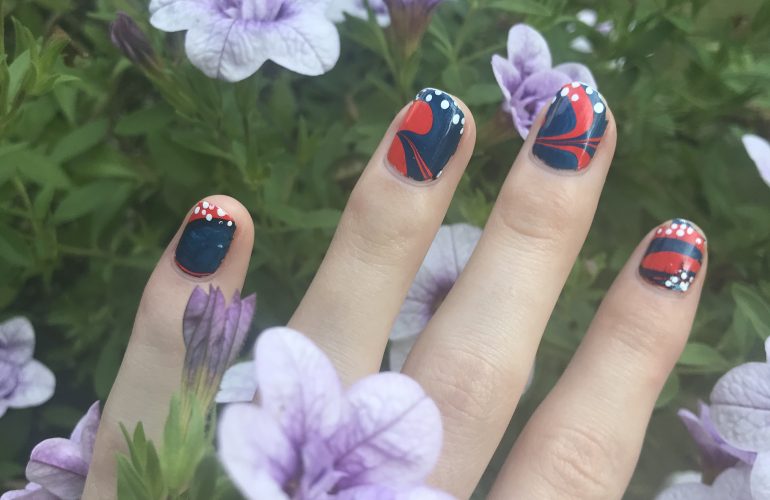
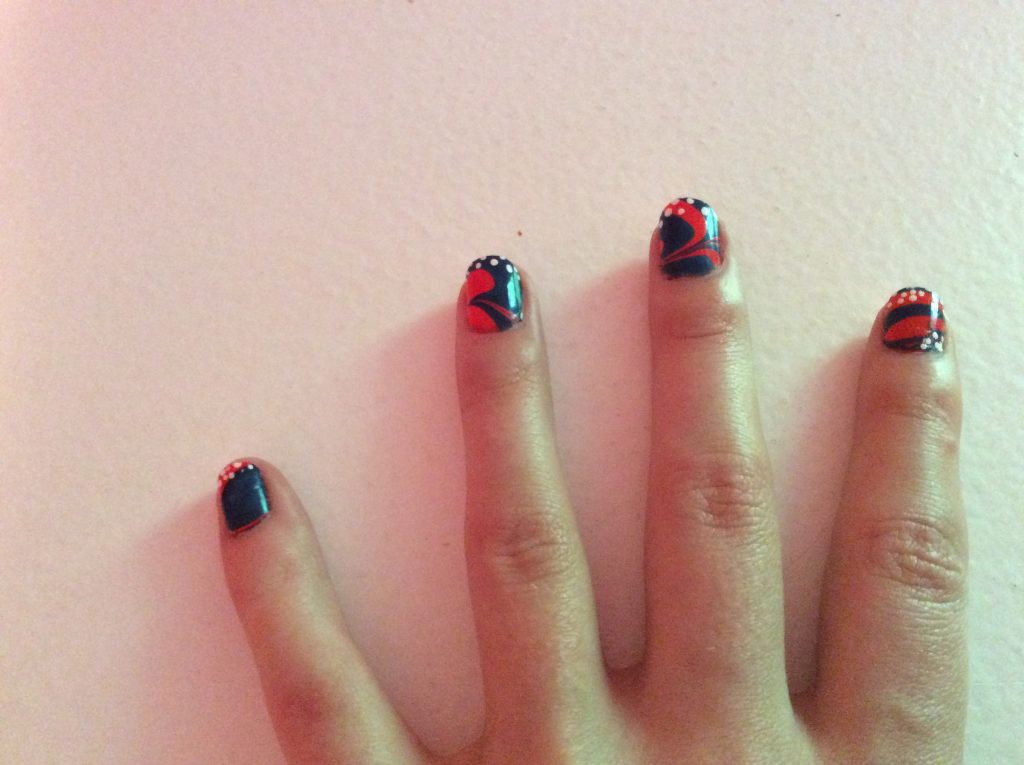
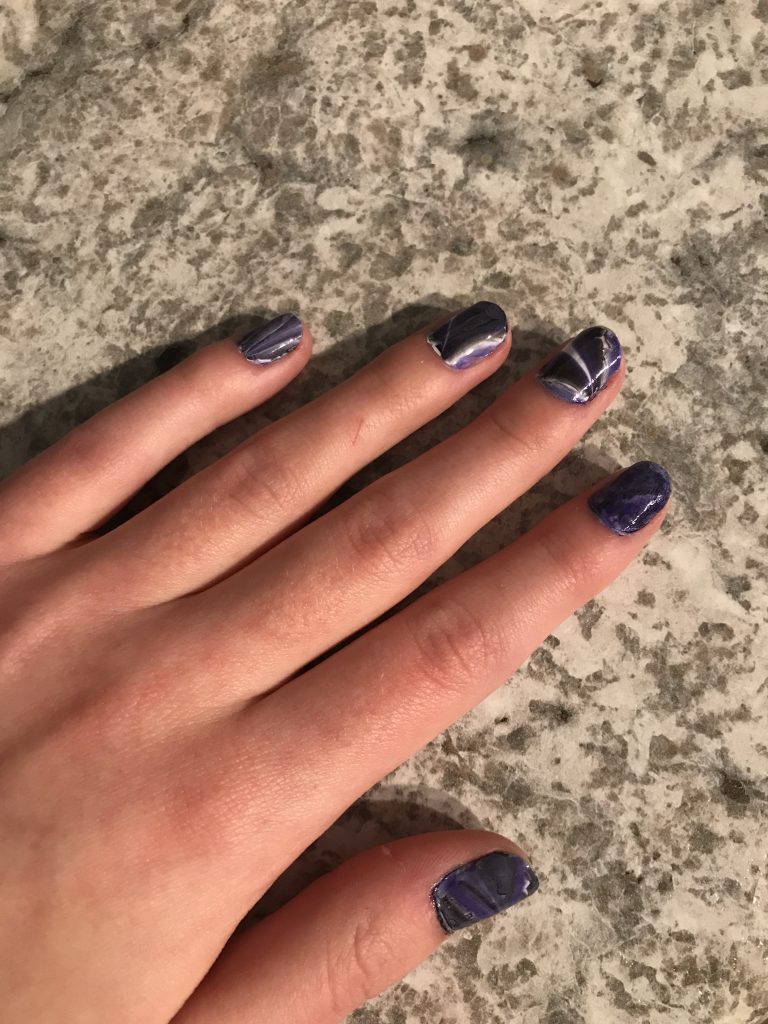
Here is the finished product.
I added some white dots for a patriotic feel and to cover up any chips revealing the white undercoat.
Trick to Redeem Botched Nails
So you’re reading this because you are already in tears with frustration because you have two terrible nails and a party in four hours. I can help. If you just do not have the right polish or you have already ruined a few nails and do not want to go back, there is a way to greatly increase the appearance of your nails. They will not look like marble nails, but they do have their own allure. The secret is to let your pattern dry for several hours (preferably a whole night) and then go over them once or twice with a swipe of cotton ball with nail polish remover. Here is the difference.
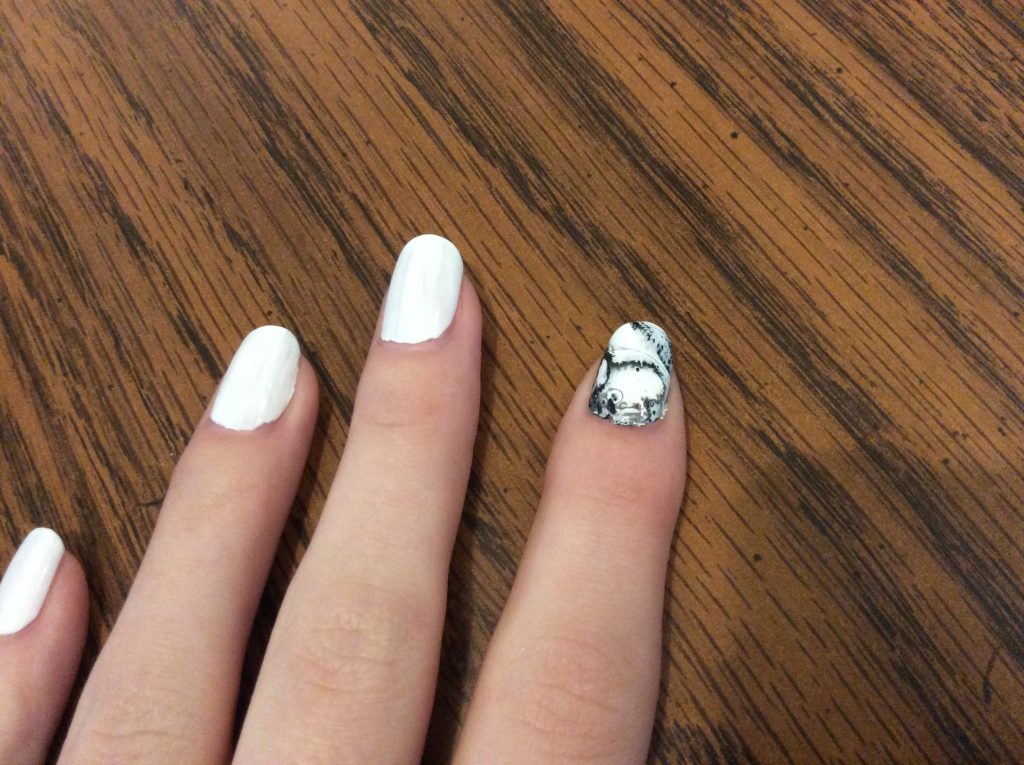
Pretty cool huh? No, they aren’t your normal marble nails, but I kind of like them. You can also just leave them as they are at first and it can also look cool.
And with that, I will close this tutorial and troubleshooting. The main take away is that if your nails do not look like the pictures online, the most likely culprit is your nail polish. Once you find a nail polish that works, marble nails are pretty easy (time consuming, but easy). And, if your nails don’t turn out like you want, try the nail polish remover trick. I hope that this post has helped you conquer marble nails and finally get that photo worthy DIY mani!
Here’s to your “marbel”ous nails!